Most RFQs treat pad printing on silicone as a line item — “print our logo on the keypad” — the same way you would order printing on ABS. Silicone does not behave like ABS. Its surface energy is around 20–24 mN/m, nothing standard bonds to it, and the part flexes every time it is used.
The problem rarely shows up at first article. It shows up in month three: legends thinning under thumb contact, edges fuzzing on a curved key top, one lot glossier than the last. By then tooling is cut, the cliché is etched, and the fix costs more than the decoration.
This is how the process actually behaves on our floor — depth, pad, ink ratio, cure window — and the specific points where pad printing stops being the right answer.
Executive Summary
- Pad printing wins on curvature, not on area. Under roughly 80 × 80 mm per stroke, and on radii a 40–60 Shore A pad can wrap, it beats screen printing; above that, it does not.
- Adhesion is chemistry, not pressure. Two-part silicone ink with a 10:1 catalyst ratio and a full cure cycle is the only reliable bond; primer and plasma fix the surface, never the ink.
- The failure mode is thin ink, not no ink. Cliché etched shallower than ~25 µm looks fine at first article and rubs through in field use.
How Pad Printing Moves Ink Onto a Silicone Part
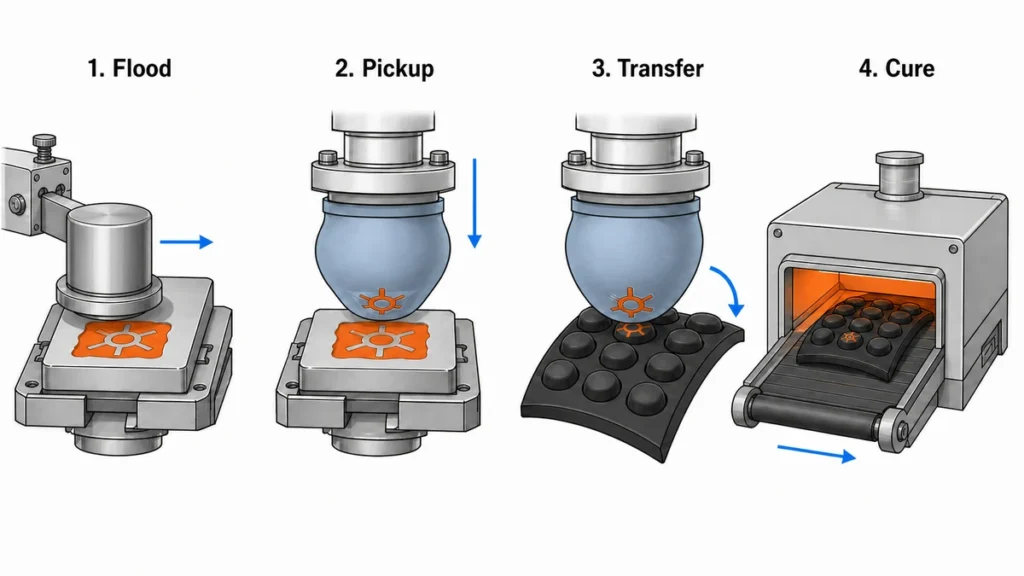
Pad printing is indirect gravure. The image lives in an etched steel or polymer plate (the cliché), a silicone pad lifts the ink out of the etch, and the pad — not the plate — touches the part. That single indirection is the reason it handles domed key tops, wristband curves, and irregular industrial parts that a flat screen cannot reach.
Four stages, each with its own drift:
1. Ink cup flood and doctoring
A sealed ink cup floods the etch and doctors the surface clean in one pass. If the doctor ring wears, ink stays on the plate land and prints as haze around the image. On silicone jobs we check ring seal every colour change, because silicone ink is high-viscosity and loads the ring faster than solvent ink for plastics.
2. Ink pickup
The pad presses onto the flooded etch. Solvent flashes from the exposed ink film in the etch during the few hundred milliseconds before pickup — that flash is what makes the ink tacky enough to leave the plate and cling to the pad.
3. Transfer
The pad rolls onto the part. Because the pad surface is also silicone, its release energy is lower than the part’s after pretreatment — the ink prefers the part. This balance is fragile. A pad that has picked up silicone oil from a poorly post-cured part will start rejecting ink within roughly 500 strokes.
4. Cure
The print is not finished when it looks finished. Two-part silicone ink is still uncrosslinked at this stage and will smear under a fingernail for hours.
Why Does Cliché Depth Decide Opacity and Edge Sharpness?
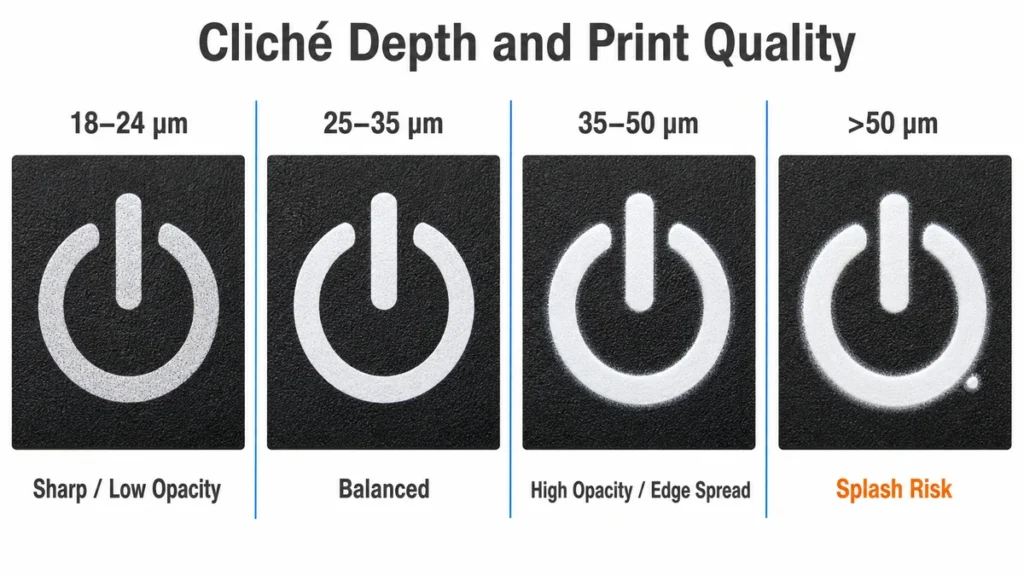
Because the etch is the only thing metering the ink volume. Silicone ink is opaque but soft; on a coloured silicone part, a white legend needs film thickness, and film thickness comes from depth.
| Etch depth | Behaviour on silicone | Use case |
|---|---|---|
| 18–24 µm | Sharp edges, weak opacity on dark parts, early rub-through | Fine text on light-coloured parts only |
| 25–35 µm | Balanced — our default for keypad legends | Most spoke / legend work |
| 35–50 µm | High opacity, slight edge spread and splash risk | White or light ink on black silicone |
| >50 µm | Ink splash, halo, slow flash-off | Rarely justified |
Laser-etched steel plates hold depth more consistently than photopolymer across long runs; photopolymer erodes and the print gets thinner over a shift without anyone changing a setting. That slow loss is the most common cause of “the first 2,000 pieces are fine, the last 3,000 are grey”.
This is where teams misjudge the process. Depth is treated as a printer’s internal parameter, so it never appears in the drawing or the PO. Then a second supplier quotes the same artwork at 20 µm, wins on price, and the legend fails a rub test that the original part passed for two years.
Pad Selection: Durometer, Shape and Curvature Limits
The pad is a consumable with a spec, not a generic rubber block.
| Pad durometer | Behaviour | Where we use it |
|---|---|---|
| 20–40 Shore A | High conformity, image distortion increases | Deep curves, textured surfaces, soft key domes |
| 40–60 Shore A | Balanced roll-off, general purpose | Most silicone keypads, mats, flat-ish parts |
| 60–80 Shore A | Minimal distortion, needs near-flat surface | Fine text, 0.2 mm lines, multi-colour registration |
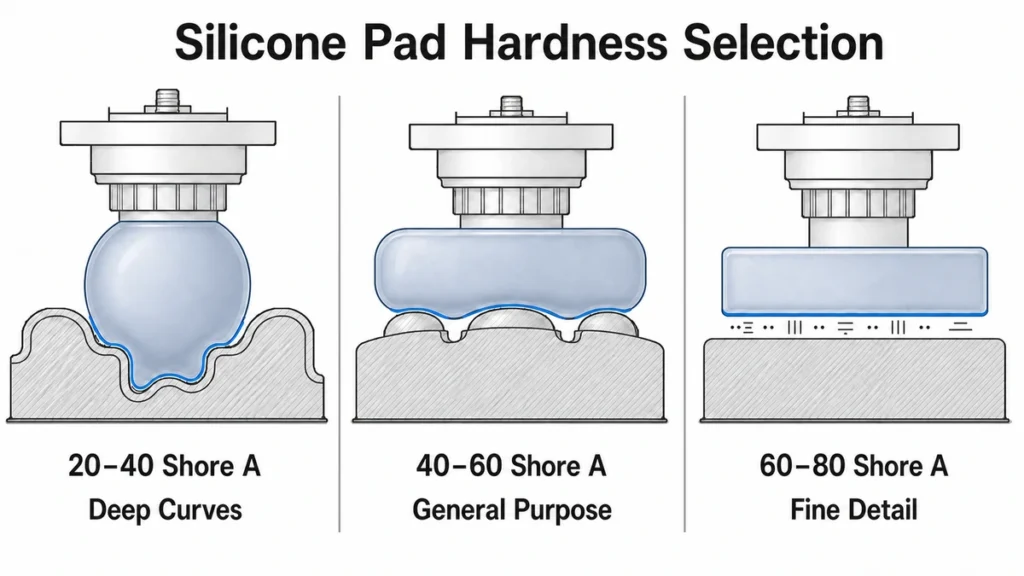
Shape matters as much as hardness. A round pad rolls ink off from a point outward and is the most forgiving; a bar or loaf pad covers long linear graphics with less distortion but is unforgiving about tilt. Steep-angle pads shed trapped air; flat pads trap it and print pinholes.
Pads also break in. A new pad prints slightly differently for roughly its first 200 to 300 strokes while the surface conditions. On tight-registration jobs we run the break-in on scrap before first article — otherwise the approved sample does not match the production it approved.
Curvature is the real boundary. As a working rule, a compound curve with a radius below roughly 8 mm starts distorting the image visibly, and text stretches along the roll direction. Artwork can be pre-distorted in the cliché to compensate, but that pre-distortion is locked to one part geometry. Change the key top radius and the plate is scrap.
What Makes Two-Part Silicone Ink Different From Standard Pad Printing Ink?
Standard solvent inks — the epoxy or acrylic systems used on ABS, PC or coated metal — do not bond to silicone. They sit on top and peel with a fingernail. Printing silicone requires a silicone-based ink system: a silicone resin carrier, pigment, and a catalyst that crosslinks the ink into a network compatible with the substrate.
The operational consequences:
- Mix ratio is fixed, typically 10:1 by weight (ink : catalyst) for common two-part silicone ink series. Under-catalysed ink cures soft and rubs off; over-catalysed ink gels in the cup.
- Pot life is short. Once catalysed, usable life runs roughly 4–8 hours depending on shop temperature. Catalysed ink must never be poured back into the uncatalysed stock — that contaminates the whole container.
- Thinner is part of the recipe, usually 10–15% by weight, and it controls flash-off, not just viscosity. Too much thinner and the ink will not leave the plate cleanly.
- Colour matching happens after cure, not in the cup. Silicone inks shift on cure; a Pantone approval taken from wet ink is meaningless.
More on chemistry and formulation trade-offs in Silicone Printing Ink Formulations and Innovations.
Does Silicone Need Pretreatment Before Pad Printing?
Sometimes — and the honest answer is that it depends on how the part came out of the mould, not on the ink datasheet.
A freshly post-cured, oil-free part printed with matched silicone ink can print without pretreatment; several ink suppliers demonstrate exactly that on clean silicone keyboards. Production parts are rarely that clean. Mould release, silicone oil bloom from incomplete post-cure, and handling contamination all sit on the surface and are the true cause of most “the ink does not stick” complaints.
What we control before the pad ever touches the part:
- Post-cure discipline (typically 200 °C for 2–4 hours depending on the compound) to drive off volatiles that would otherwise migrate to the surface later
- IPA wipe or ultrasonic clean, and a defined maximum hold time between cleaning and printing
- Primer or plasma only when the compound, pigment loading, or a filled grade demands it
Plasma raises surface energy but its effect decays — treated parts left overnight lose much of it. Primer is more forgiving in a batch workflow but adds a step and a drying window. Neither compensates for oil bloom; they just fail more slowly. The cleaning, post-cure, activation and primer sequence is covered in detail in silicone surface pretreatment.
Cure Window: Temperature, Time, and What Under-Cure Looks Like
Heat is what turns a printed film into a bonded one. Common two-part silicone inks cure in the range of 120–150 °C for 3–10 minutes in a tunnel oven, or air-dry at room temperature over roughly 24 hours with full crosslink continuing for up to 72 hours.
The part’s own mass changes the answer. A 1 mm keypad web reaches temperature in seconds; a 6 mm industrial grommet does not. Setting tunnel time by belt speed instead of by part core temperature is how a shop produces a passing first article and a failing lot.
Two checks we run instead of trusting the timer:
- Stretch test — flex and elongate the printed area aggressively. A fully cured print stretches with the part; an under-cured one cracks or lifts at the edges.
- Cross-hatch tape test per ASTM D3359 / ISO 2409, plus a solvent rub with IPA. We record the classification, not a pass/fail opinion.
Over-cure has its own cost: holding light colours above ~180 °C yellows them and can embrittle the film enough that it cracks on the first hard flex.
Where Pad Printing Hits Its Limits on Silicone
This is the section worth pasting into your design review.
| Parameter | Practical limit | Notes |
|---|---|---|
| Minimum line width | 0.20 mm reliable; 0.15 mm case-by-case | Below this, ink bridges or breaks depending on pad durometer |
| Minimum text height | ~1.0 mm | Legibility, not printability, fails first |
| Print area per stroke | ~80 × 80 mm | Larger areas lose ink film uniformity at the centre |
| Colours | 1–4 practical | Each colour is a separate station, plate, and registration risk |
| Registration, flat part | ±0.10–0.15 mm | With a rigid fixture |
| Registration, curved / soft part | ±0.25 mm or worse | The part itself deforms under pad pressure |
| Workable radius | ≥8 mm for undistorted image | Tighter radii need pre-distorted artwork |
| Ink film thickness | ~5–15 µm after cure | Set by etch depth, not by pressure |
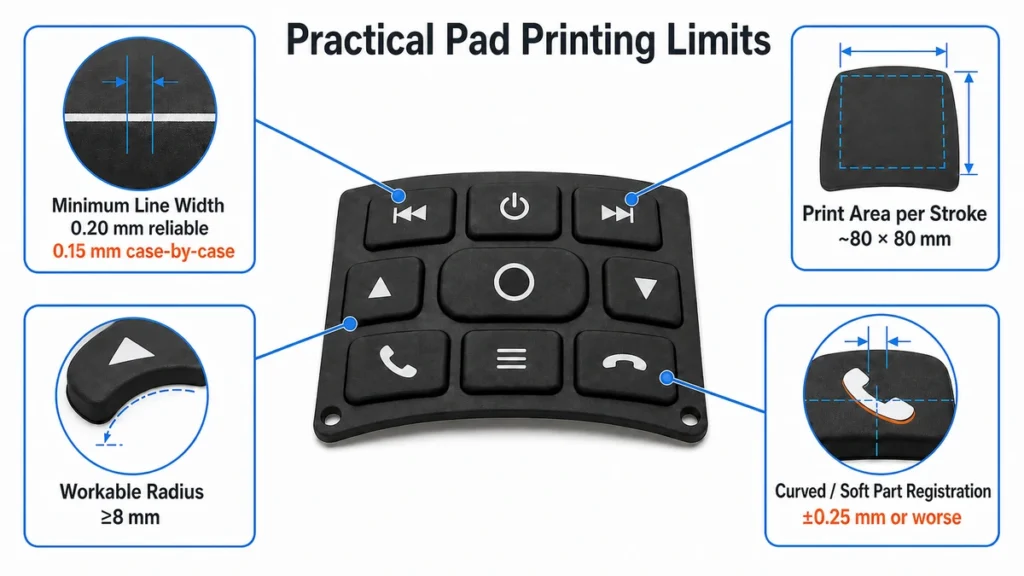
Multi-colour is where estimates break down most often. On a rigid plastic part, four-colour pad printing is routine. On silicone, the part compresses differently under each pad strike, and a 40 Shore A keypad web will not return to exactly the same position at station four as it held at station one. Wet-on-wet also behaves differently: silicone ink stays open longer, so a second colour laid too soon lifts the first.
If the artwork needs tight colour-to-colour registration on a soft part, the honest recommendation is to redesign the artwork for separation — deliberate gaps between colours — rather than to buy a more expensive machine.
When Should You Choose Pad Printing Over Screen or Transfer Printing?
Short version: choose by geometry, not by unit price. Pad printing is the only one of the three that puts a targeted image onto a compound curve.
| Pad printing | Screen printing | Transfer printing | |
|---|---|---|---|
| Surface | Curved, domed, irregular, recessed | Flat or single-axis curve | Curved, wrap-around |
| Area and colours | ≤~80 mm per stroke, 1–4 colours | Large and continuous, 1–6 colours | Large wrap, full colour |
The full method-by-method comparison — tooling cost, registration behaviour, durability under wear — belongs on its own page and is not repeated here.
Laser engraving is the fourth option and the only one with no ink to fail — but it removes the coating layer instead of adding one, so it is a different visual result, not a substitute.
For the full decision path across all four methods, see the pillar guide How to Print On Silicone.
What Locks the Cost of a Pad Printing Job
Three things, in order of impact:
- Plate count. One cliché per colour, per artwork revision. A laser-etched steel plate runs on the order of USD 40 to 80 each and holds depth for long runs; photopolymer is cheaper but behaves as a consumable, not as tooling. Artwork changes after plate etching are not free adjustments; they are new plates.
- Colour changeover. Silicone ink cleanup is slower than solvent ink cleanup, and catalysed ink left in the cup is scrap. Budget 20 to 40 minutes per colour change, so a four-colour job on a short run spends more time cleaning than printing.
- Cycle and cure occupancy. The print stroke takes about a second, and a single-colour station loaded manually sustains roughly 900 to 1,500 parts an hour. The cure tunnel is the constraint, and thick parts hold the line.
MOQ follows from setup, not from material. A single-colour legend on an existing part is workable from a few hundred pieces; a four-colour print on a new curved geometry rarely makes economic sense below 3,000 to 5,000, because the pre-distorted artwork has to be iterated against physical samples before anything is repeatable.
Typical Applications on Our Floor
- Silicone keypad legends — the dominant use. Usually one or two colours, followed by a protective coating. See Silicone Keypad Printing & Labeling Techniques and Silicone Keypad Surface Finishes & Coatings for what goes on top of the ink.
- Wristbands and straps — small logos on a continuously flexing surface; ink elasticity matters more than opacity.
- Irregular industrial parts — grommets, seals, housings where a screen simply cannot reach the surface.
- Baby and food-contact items — printable, but ink compliance becomes the governing constraint, not print quality.
What This Means Before You Release the Drawing
Pad printing on silicone is not the limiting factor in most projects — the surface condition of the moulded part is. A part with residual mould release or an incomplete post-cure will fail adhesion testing no matter which ink, pad, or plate depth is used, and the print shop will be blamed for a moulding decision made weeks earlier.
Before quoting we need four things: the part geometry with the print-face radius, the artwork with its finest line width and colour count, the substrate compound and hardness, and the durability standard the print has to survive — a rub cycle count, a solvent, or a compliance requirement. Without the durability standard the quote is a guess, and so is the process window behind it.
If the print has to survive daily thumb contact for years, the conversation is not really about pad printing at all — it is about whether the legend should be printed, coated, or engraved.
References
- Pad printing (indirect offset gravure) — Wikipedia, continuously updated
- ASTM D2240-15(2021), Rubber Property — Durometer Hardness — ASTM International, current edition
- ASTM D3359-23, Rating Adhesion by Tape Test — ASTM International, updated Mar 2023
- ISO 2409:2020, Paints and varnishes — Cross-cut test — ISO, current edition
- 21 CFR 177.2600, Rubber articles intended for repeated use — US FDA / eCFR, current text
- Surface Modification of Polymers by Plasma Treatment — NIH PMC, 2024 (on post-treatment aging of surface energy)
- Surface energy data for PDMS — compiled literature values, 20–24 mJ/m²