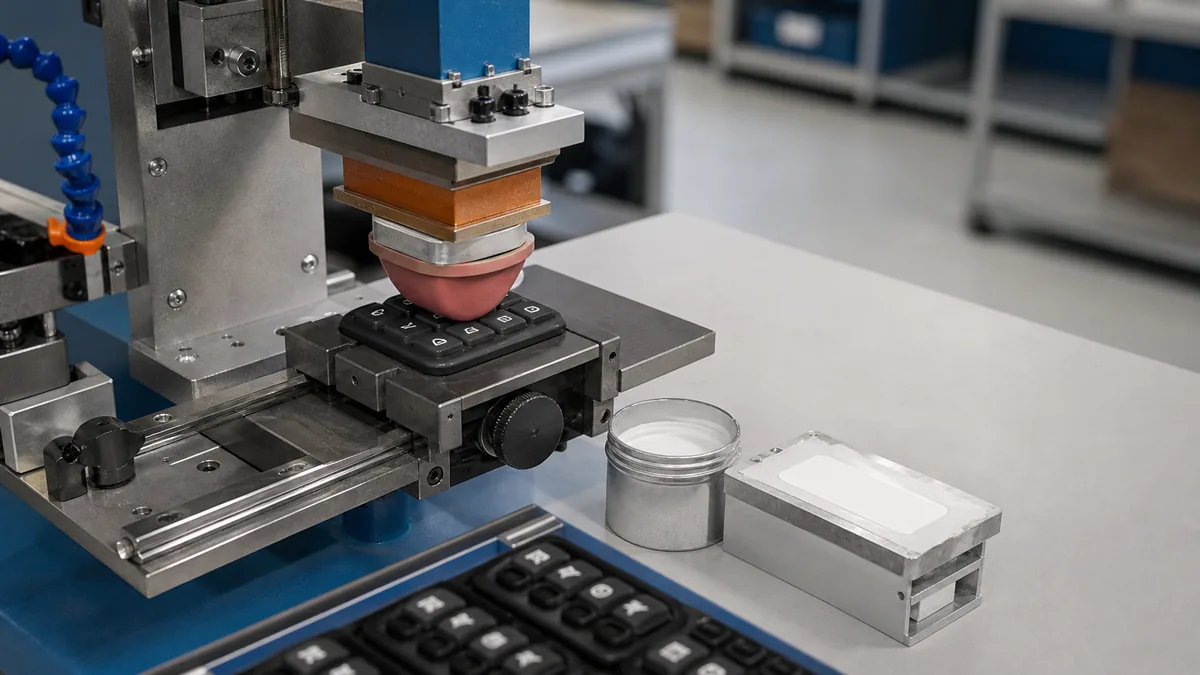
Most printing problems on silicone do not start at the press. They start when a buyer sends artwork that was approved for an ABS or PP part and assumes the same decoration path applies. It does not. To print on silicone you need an ink that cross-links with the substrate, a surface that has been cleaned or activated, and a cure step that is held long enough for the ink to finish reacting.
The failure is rarely visible at first article. The sample passes, the PO is placed, and the print looks correct leaving the oven. What shows up eight to twelve weeks later is drift: edges lifting on the radius, color hazing after dishwasher cycles, logos cracking where the part stretches. By then the tooling, the artwork, and the price are locked.
This is how we set the boundaries on our own line, and where the control points actually sit.
Executive Summary
- Only two-component silicone inks (platinum or peroxide catalyzed) form a lasting bond on cured silicone — solvent, UV, and standard screen inks sit on the surface and shear off.
- Surface preparation is not optional: mold release residue and low-molecular-weight siloxane bleed are the two most common causes of “good ink, bad adhesion.”
- Print durability is decided in the oven, not at the press — under-cured ink stays tacky, picks up dust, and fails cross-hatch testing weeks after shipment.
Why Won’t Standard Inks Stick to Silicone?
Because silicone’s surface energy is too low for the ink to wet it. Cured silicone rubber sits around 20–24 mN/m. Solvent-based and UV inks are formulated to wet substrates in the 38–44 dyne range. The ink beads, sits on top, and holds only by mechanical grip — which a flexible part destroys the first time it is stretched or folded.
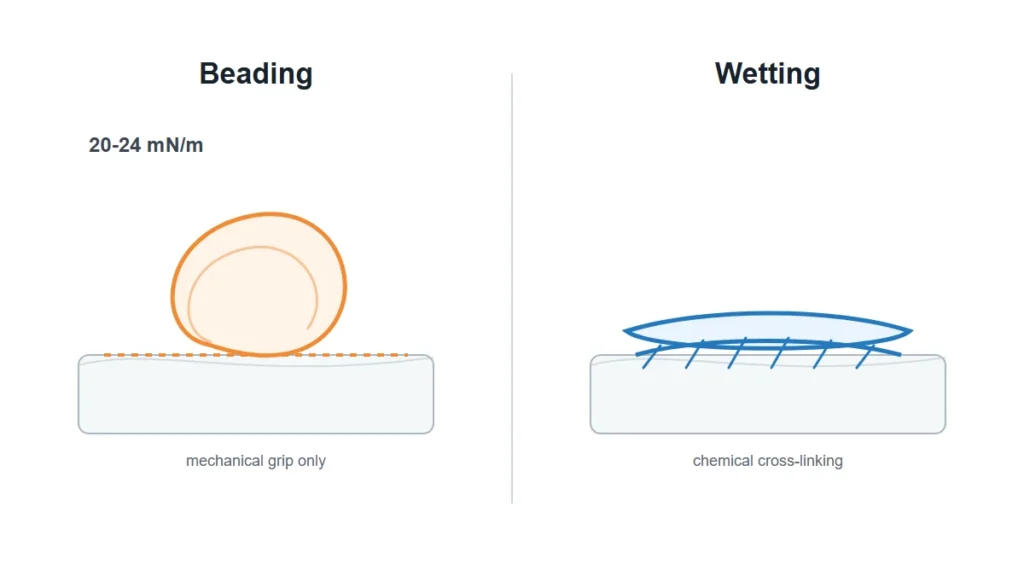
Two-component silicone inks (the SE- and SI-type systems most decorators run) solve this chemically. The ink is a silicone polymer with pigment; the catalyst drives cross-linking into the substrate surface during heat cure. The bond is covalent, not adhesive. That is why the industry rule holds: nothing sticks to silicone but silicone.
There is a second reason engineers underestimate this. Ink adhesion is usually treated as a decoration line problem, so it gets specified after the part is designed. But the cure system of the part itself — platinum-cure LSR versus peroxide-cure HCR — changes what the surface looks like when it reaches the press. Peroxide-cured parts carry cure by-products; platinum-cured parts carry inhibitors from unreacted sites. Neither is a defect. Both change ink behavior. Read more on how ink chemistry is formulated for these substrates in silicone printing ink formulations.
What Surface Preparation Actually Changes Adhesion?
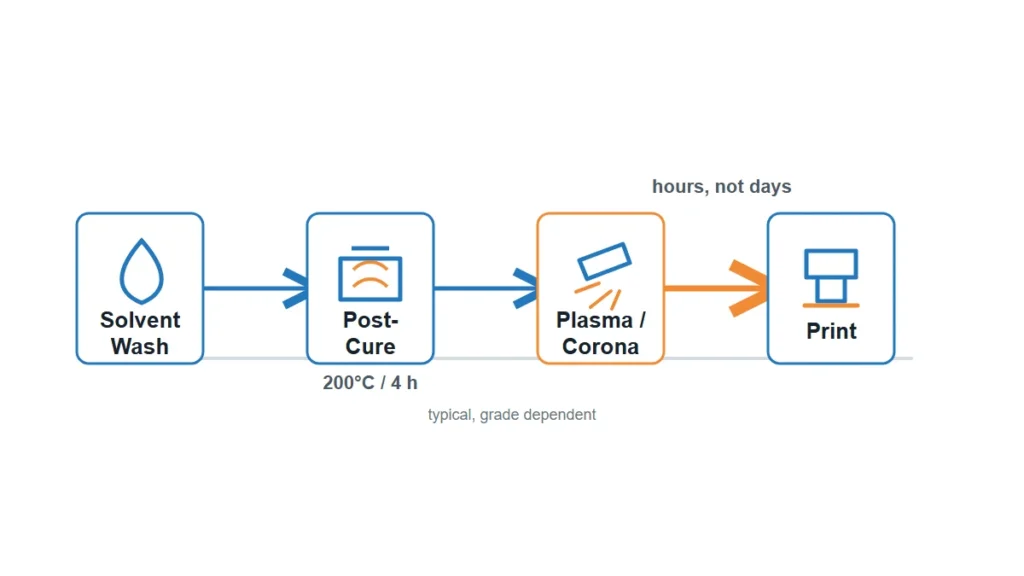
Cleaning changes more than activation does, in most cases we see. The full sequence — solvent wash, post-cure, activation, and primer selection — is covered in silicone surface pretreatment.
Mold release and demolding residue
Parts that were demolded with a release agent carry a transfer film that no ink will bond through. An IPA or alcohol wipe removes handling oils but not a silicone-based release. If the part was produced with release agent, the decoration step needs a solvent wash and full dry-off before printing, and that step needs to be written into the routing — not left to the operator.
Post-cure and oil bleed
Uncured low-molecular-weight siloxane migrates to the surface over time. Print onto a part carrying that bleed and the ink cures onto a layer that is still moving. Post-curing (commonly 200°C for 4 hours, depending on grade and wall thickness) drives off those volatiles. For food-contact and medical parts the post-cure is already required; for industrial parts it is often skipped to save oven time, and that decision quietly becomes a print adhesion problem.
Plasma or corona activation
Activation raises surface energy so the ink wets evenly. It works, but it has a shelf life — the effect decays within hours, sometimes minutes on thin sections. If activated parts sit overnight in a tote before printing, you have paid for the treatment and lost it. Sequence matters more than the treatment itself.
Primers
A primer creates a bonding layer where activation is impractical — deep recesses, complex geometry, mixed-substrate assemblies. The trade-off is an extra flash-off step and one more variable to control in mass production.
Which Printing Method Fits the Part Geometry?
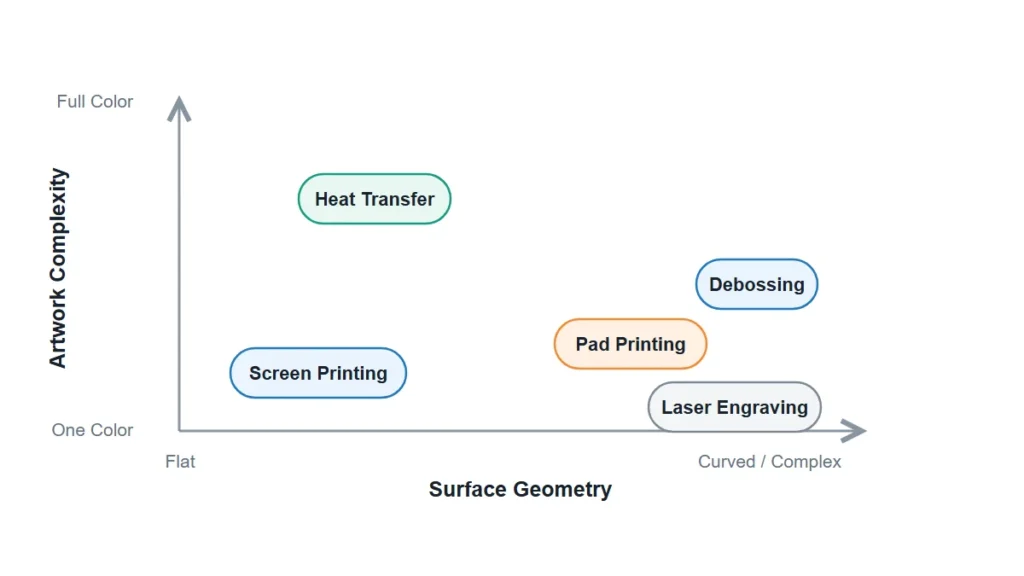
Method selection is driven by geometry and artwork detail, not by preference.
| Method | Best fit | Detail limit | Colors | Main constraint |
|---|---|---|---|---|
| Pad printing | Curved, recessed, irregular surfaces; small logos on keypads, caps, wristbands | Fine — laser plates at 35–50 µm etch depth give best opacity without ink splash | One per pass; wet-on-wet possible | Silicone ink tends to stick to the pad; requires frequent pad cleaning |
| Screen printing | Flat or gently curved areas; larger solid blocks, mats, sheets | Medium — mesh count drives film thickness | One per pass, registration-dependent | Thick deposits crack on stretch; mesh choice trades coverage against flexibility |
| Heat transfer / silicone transfer | Full-color artwork, gradients, multi-color logos | High | Full color in one application | Higher unit cost; film and press tooling add lead time |
| Laser engraving | Permanent marks, serial numbers, date codes | Very fine | None — tonal contrast only | No color; contrast depends on pigment loading of the base compound |
| Debossing / molded-in | Logos that must outlast the print entirely | Coarse — draft and radius limited | None | Locked at tooling; no artwork changes after mold cut |
For process-level detail on the most common paths, see pad printing, silicone screen printing and silicone transfer printing. For permanent marking without ink, see laser engraving silicone.
One judgment worth stating plainly: if the print sits on a surface that flexes repeatedly — a bib fold, a wristband, a keypad web — a molded or debossed feature outlives any printed one. We recommend it even though it removes a decoration line from the quote.
How Do You Mix and Cure Silicone Ink Without Drift?
Two-component silicone ink is mixed at the press, typically around 10% catalyst by ink weight, with thinner added to reach printing viscosity — anywhere from 10% to 70% depending on color and method. That range is the first place batch-to-batch variation enters. An operator adjusting thinner by eye to fix a squeegee issue is also changing film thickness, opacity, and cure behavior.
Once catalyzed, the ink has a working pot life. Ink left in the cup past that point still prints and still looks correct — it simply cures weaker. This is the single most common cause of prints that pass visual inspection and fail a tape test a week later.
Cure is heat-driven, not air-dry. Typical oven windows run roughly 135–200°C, with dwell time scaled to part mass and substrate density. Thick-wall or highly filled parts absorb heat slowly; the ink surface reaches temperature long before the bond completes.
| Control point | What to fix in the process sheet | What happens if it drifts |
|---|---|---|
| Catalyst ratio | Weighed, not eyeballed; recorded per batch | Under-catalyzed ink stays soft and abrades off |
| Thinner % | Range locked per color and per method | Film thickness and opacity shift between shifts |
| Pot life | Time-stamped ink cups, discard rule | Prints look fine, fail adhesion later |
| Oven temp / dwell | Verified with a probe on the part, not the oven setpoint | Surface cure only; bond never completes |
| Cooling and stacking | Full cool before nesting | Blocking, print transfer, edge lift |
Why Does the Print Fail Weeks After Shipment, Not at First Article?
Because the mechanisms that destroy prints on silicone are cumulative, and first article inspection is a snapshot.
Three patterns account for most of what comes back to us:
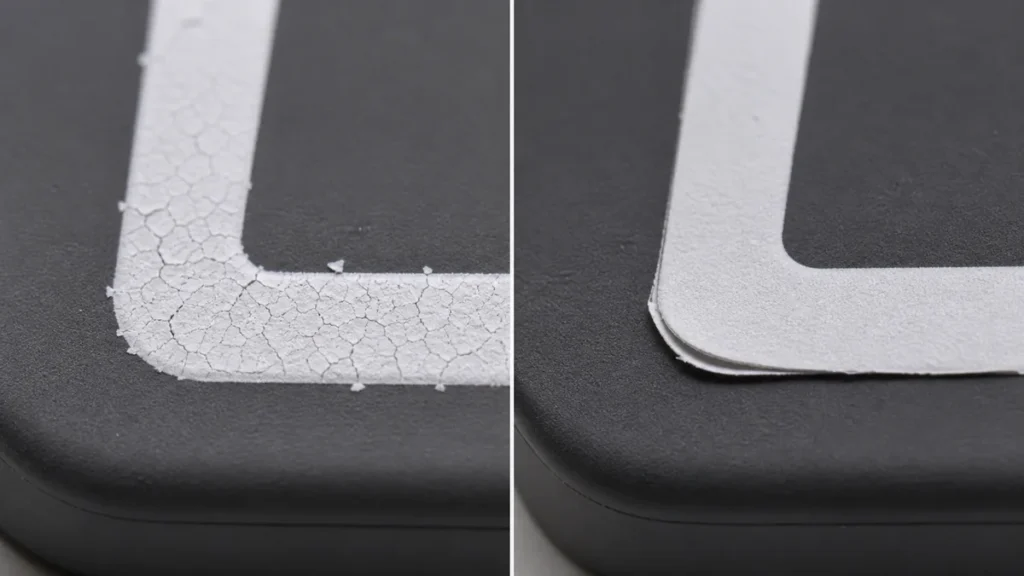
Oil bleed under the ink. Residual low-molecular-weight siloxane keeps migrating after the part ships. It works its way to the interface and lifts the print from underneath — usually starting at edges and radii where the film is thinnest.
Stretch cracking. A cured ink film is more rigid than the substrate under it. Where elongation is high and repeated, the film cracks in a spider pattern first, then flakes. Thicker deposits crack sooner, which is why the instinct to “print heavier for better coverage” backfires.
Wash and abrasion cycling. Dishwasher exposure combines heat, alkaline detergent, and mechanical contact. A print that survives 50 cycles can fail at 200. Kitchen and baby product buyers rarely specify a cycle count, and suppliers rarely volunteer one.
Teams misjudge this because the acceptance gate sits at the wrong point in time. The sample was never the risk; the 90-day part was. On products where this matters, we specify what the print must survive before quoting, not after. Related: how to make sure logo printing on silicone doesn’t peel off.
Adhesion Testing and Acceptance Criteria
A print spec without a test method is not a spec. These are the checks that separate a real acceptance criterion from an opinion.
| Test | What it catches | Practical notes |
|---|---|---|
| Cross-hatch tape test (ASTM D3359) | Incomplete cure, contaminated surface | Fast, destructive, run per batch on flat sections |
| Rub / crock test | Under-cure, weak film | Define cycles and load, or results aren’t comparable |
| Solvent rub (IPA) | Under-cured ink surface | Ink softening indicates incomplete cross-link |
| Stretch cycle test | Film rigidity vs substrate elongation | Essential for wristbands, bibs, keypad webs |
| Wash / autoclave cycling | Long-term service failure | Specify cycle count and temperature up front |
Run the test after full cure and cool-down, not off the oven exit. A hot part will pass tests it would fail two hours later.
What Artwork and Design Details Change Print Yield?
Artwork drives more scrap on silicone than most buyers expect, because the substrate is doing things paper and plastic do not.
Fine line work is limited by ink film behavior and substrate flex, not by plate resolution. Very thin strokes and small reversed-out text either fill in or break up after a few thousand impressions. On dark or colored silicone, opaque coverage usually requires a white underbase, which adds a pass, a registration risk, and film thickness — the same thickness that cracks under stretch.
Color matching is the other recurring gap. A Pantone approved on a white chip does not reproduce identically over a pigmented substrate; the base color shifts the result. Match against the actual production compound and the actual durometer, not a reference chip. Small changes in part hardness change ink lay-down enough to shift perceived color.
Surface texture matters too. A matte or patterned surface holds ink differently than a gloss surface, and the texture itself can be a substitute for printing where branding needs to be permanent — see silicone product surface pattern processing and surface treatments and texture durability.
For application-specific decoration constraints, see silicone keypad printing and labeling techniques and silicone mats with printed logos.
Where the Boundaries Sit
Printing on silicone is controllable, but the control points are upstream of the press: compound cure system, post-cure, release agent policy, activation-to-print window, catalyst discipline, and oven verification. Get those fixed and method selection becomes a straightforward geometry decision. Leave them open and no ink brand rescues the job.
What we cannot answer generically is durability, because durability is defined by the service condition, not by the ink. A wristband logo, an autoclaved medical marking, and a dishwasher-cycled bib are three different specs that look identical on a drawing.
To quote or engineer a decoration path, we need five things: base compound and cure system (LSR / HCR, platinum or peroxide), part durometer and substrate color, artwork in vector format with the smallest line width called out, the service condition the print must survive (wash cycles, sterilization, abrasion, UV), and any contact regulation in scope (FDA 21 CFR 177.2600, LFGB, USP Class VI). Without the service condition, any adhesion promise is a guess.
References
- Deviation from linear relationship between adhesion strength and surface free energy on a low energy surface — Results in Surfaces and Interfaces, Elsevier, 2023. https://www.sciencedirect.com/science/article/pii/S2452321623003220
- Platinum-Catalyzed Hydrosilylation in Polymer Chemistry — Polymers (review), hosted by PubMed Central / NIH, 2020. https://pmc.ncbi.nlm.nih.gov/articles/PMC7598247/
- Pretreatment of Liquid Silicone Rubbers to Remove Volatile Siloxanes — Industrial & Engineering Chemistry Research, American Chemical Society. https://pubs.acs.org/doi/10.1021/ie061666q
- Lebensmittel- und Futtermittelgesetzbuch (LFGB), full statutory text — German Federal Ministry of Justice, Gesetze im Internet. https://www.gesetze-im-internet.de/lfgb/
- 〈88〉 Biological Reactivity Tests, In Vivo (basis of USP Class VI) — United States Pharmacopeia. https://doi.usp.org/USPNF/USPNF_M98834_01_01.html
- Standard Test Method for Wetting Tension of Polyethylene and Polypropylene Films, D2578-23 — ASTM International, current active version. https://store.astm.org/d2578-23.html
- Standard Test Methods for Rating Adhesion by Tape Test, D3359-23 — ASTM International, current active version. https://www.astm.org/d3359-23.html
- 21 CFR 177.2600 Rubber articles intended for repeated use — U.S. Electronic Code of Federal Regulations, Title 21 amended 07/23/2026. https://www.ecfr.gov/current/title-21/chapter-I/subchapter-B/part-177/subpart-C/section-177.2600